初心者が進めるiphoneアプリ開発
Macもiphoneすらもよく使ったことのない超初心者がお送りする、iphoneアプリの作り方の解説です。難しいことは抜きにしてとにかく動かしてみましょう。
×
[PR]上記の広告は3ヶ月以上新規記事投稿のないブログに表示されています。新しい記事を書く事で広告が消えます。
「RootViewController」を編集して、ルートの項目がタップされたらその子テーブルに文字列を表示するようにします。
「RootViewController.h」の編集
「RootViewController.m」の編集
メソッドのテンプレートが用意されているので、その中に追記していきます
「NavBarAppDelegate.m」の編集
「NavBarAppDelegate.m」でアプリケーション起動後初期化のメソッドに、ルートのテーブル設定を記述します。(このメソッドは起動時に実行されます)
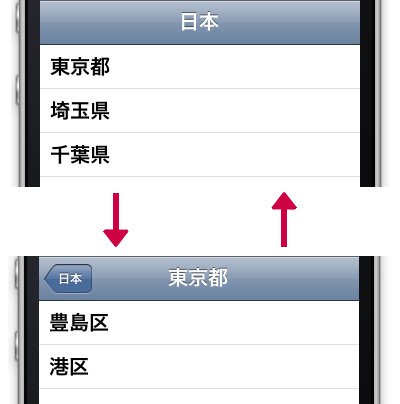
「東京都」をタップすると、その子テーブルへ移動、「日本」をタップすると上の階層に戻ることもできます。
「RootViewController.h」の編集
#import@interface RootViewController : UITableViewController { //セルの名前用配列を作成 NSArray *names; } //プロパティを宣言 //「RootViewController」に配列「names」をプロパティとして持たせます @property (retain) NSArray *names; @end
「RootViewController.m」の編集
メソッドのテンプレートが用意されているので、その中に追記していきます
//プロパティを実装
@synthesize names;


//テンプレートに追記
- (NSInteger)tableView:(UITableView *)tableView
numberOfRowsInSection:(NSInteger)section {
    //テーブルビューのセル数を設定
    //プロパティnamesにより、テーブルのセル数はnamesの項目数に相当する
    return [names count];
}


//テンプレートに追記
//基本的にはTableViewと同じ記述
- (UITableViewCell *)tableView:(UITableView *)tableView
cellForRowAtIndexPath:(NSIndexPath *)indexPath {
    static NSString *CellIdentifier = @"Cell";

    UITableViewCell *cell =
    [tableView dequeueReusableCellWithIdentifier:CellIdentifier];

    if (cell == nil) {
        cell=[[[UITableViewCell alloc]initWithFrame:CGRectZero
        reuseIdentifier:CellIdentifier]autorelease];
    }

    //セルの形成
    cell.text=[names objectAtIndex:indexPath.row];
    return cell;
}


//テンプレートに追記
//テーブルがタップされたときの動作
- (void)tableView:(UITableView *)tableView
didSelectRowAtIndexPath:(NSIndexPath *)indexPath{
    //クリックされたセルの名前を取得
    //ルートのテーブル名と比較
    NSString *name;
    name=[names objectAtIndex:indexPath.row];

    //クリックされたセルの名前に対するテーブル表示用
    NSArray *childNames=nil;    //子テーブルのセル文字列格納用
    if ([name isEqualToString:@"東京都"]) {
        childNames=[NSArray arrayWithObjects:@"豊島区",@"港区",nil];
    }
    else if ([name isEqualToString:@"埼玉県"]) {
        childNames=[NSArray arrayWithObjects:@"さいたま市",@"所沢市",@"熊谷市",nil];
    }
    else if ([name isEqualToString:@"千葉県"]) {
        childNames=[NSArray arrayWithObjects:@"柏市",@"我孫子市",nil];
    }

    //childNamesの中身があれば実行(下の階層があれば移動する)
    //子のテーブルを作成して、アニメーションしながら移動する
    if (childNames) {
        //RootViewControllerのインスタンスを作成
        RootViewController *childViewController;
        childViewController=[[RootViewController alloc]
        initWithNibName:@"RootViewController" bundle:nil];
        [childViewController autorelease];

        //RootViewControllerの設定
        childViewController.title=name;
        childViewController.names=childNames;

        //RootViewControllerをコントローラスタックに追加
        [self.navigationController
        pushViewController:childViewController animated:YES];
    }
}
「NavBarAppDelegate.m」の編集
「NavBarAppDelegate.m」でアプリケーション起動後初期化のメソッドに、ルートのテーブル設定を記述します。(このメソッドは起動時に実行されます)
//テンプレートに追記
//起動終了後の初期化、ルートテーブルの設定
- (BOOL)application:(UIApplication *)application
didFinishLaunchingWithOptions:(NSDictionary *)launchOptions {
    //RootViewControllerを取得
    RootViewController *rootViewController;
    rootViewController=
    (RootViewController *)navigationController.topViewController;

    //RootViewControllerを設定
    rootViewController.title=@"日本";
    rootViewController.names=
    [NSArray arrayWithObjects:@"東京都",@"埼玉県",@"千葉県",nil];

    self.window.rootViewController = self.navigationController;
    [self.window makeKeyAndVisible];
    return YES;
}
「東京都」をタップすると、その子テーブルへ移動、「日本」をタップすると上の階層に戻ることもできます。
PR
コンテンツ
Macintosh初心者の館
Xcode and iOS SDKのインストール
簡単なアプリ「Hello World」を作成1
簡単なアプリ「Hello World」を作成2
簡単なアプリ「Hello World」を作成3
簡単なアプリ「Hello World」を作成4
デバッグ用にログを取る(NSLog)
文字列を操作する(NSString)
文字列の比較と検索(NSString)
文字列を数値などに変換する(NSString)
アラートの表示(UIAlertView)
配列の生成とautorelease(NSArray)
固定配列へのアクセス(NSArray)
可変な配列の生成と操作(NSMutableArray)
要素とキーを対で持つ配列(NSDictionary)
戻り値の扱い方
タイマー(NSTimer)を使用する1
タイマー(NSTimer)を使用する2
タイマー(NSTimer)を使用する3
時間を取得して計測に使う(NSDate)
iPhoneアプリのファイル操作
Text Fieldの使い方1(UITextField)
Text Fieldの使い方2(UITextField)
Text Fieldの使い方3(UITextField)
TextView(UITextView)の使い方1
PickerViewの使い方(UIPickerView)
テーブル(UITableView)の使い方1
テーブル(UITableView)の使い方2
テーブル(UITableView)の使い方3
ナビゲーションバーの使い方1
ナビゲーションバーの使い方2
ナビゲーションバーにビューを追加する1
ナビゲーションバーにビューを追加する2
ナビゲーションバーにビューを追加する3
XMLファイルを読み込む1
XMLファイルを読み込む2
XMLファイルを読み込む3
最新記事
(12/11)
(09/19)
(09/13)
(09/05)
(09/01)
スポンサード リンク